

Trong bài hướng dẫn tạo Spring MVC Project với eclipse, chúng tôi sẽ trình bày cách tạo, cấu hình và chạy spring mvc project với eclipse.
Bên dưới là hình ảnh một số màn hình sau khi hoàn thiện bài hướng dẫn này

Hướng dẫn tạo Spring MVC Project với eclipse – Các bước thực hiện
1/ Mở eclipse -> New -> Dynamic Web Project


Các bạn lưu ý vị trí mà chúng ta bổ sung sẽ là phía sau thẻ đóng build và trước thẻ đóng project như hình bên dưới

Hướng dẫn tạo Spring MVC Project với eclipse – Cấu hình
1/ Tạo file demo-servlet.xml trong /WebContent/WEB-INF/
Chuột phải WEB-INF -> chọn New -> chọn Other…


Bổ sung đoạn code sau vào file demo-servlet.xml
<beans xmlns="http://www.springframework.org/schema/beans"
	xmlns:mvc="http://www.springframework.org/schema/mvc"
	xmlns:context="http://www.springframework.org/schema/context"
	xmlns:xsi="http://www.w3.org/2001/XMLSchema-instance"
	xsi:schemaLocation="
        http://www.springframework.org/schema/beans
        http://www.springframework.org/schema/beans/spring-beans.xsd
        http://www.springframework.org/schema/mvc
        http://www.springframework.org/schema/mvc/spring-mvc.xsd
        http://www.springframework.org/schema/context
        http://www.springframework.org/schema/context/spring-context.xsd">

	<mvc:annotation-driven />
	<context:component-scan
		base-package="vn.giasutinhoc.controller" />
	<mvc:default-servlet-handler />

	<bean id="viewResolver"
		class="org.springframework.web.servlet.view.UrlBasedViewResolver">
		<property name="viewClass"
			value="org.springframework.web.servlet.view.JstlView" />
		<property name="prefix" value="/WEB-INF/jsp/" />
		<property name="suffix" value=".jsp" />
	</bean>
</beans>
File demo-servlet sau khi bổ sung code

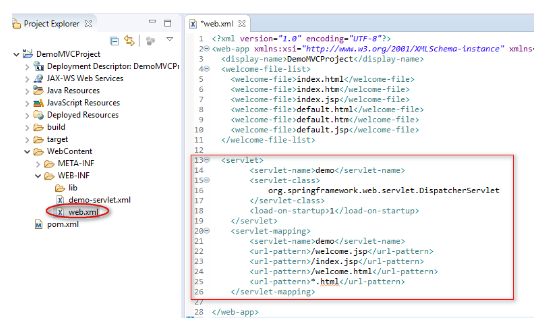
2/ Tạo file web.xml
Chuột phải Project -> chọn Java EE Tools -> chọn Generate Deployment Descriptor Sub

<servlet>
        <servlet-name>demo</servlet-name>
        <servlet-class>
            org.springframework.web.servlet.DispatcherServlet
        </servlet-class>
        <load-on-startup>1</load-on-startup>
</servlet>
<servlet-mapping>
        <servlet-name>demo</servlet-name>
        <url-pattern>/welcome.jsp</url-pattern>
        <url-pattern>/index.jsp</url-pattern>
        <url-pattern>/welcome.html</url-pattern>
        <url-pattern>*.html</url-pattern>
</servlet-mapping>
File web.xml sau khi bổ sung code
Hướng dẫn tạo Spring MVC Project với eclipse – Tạo Controller
1/ Tạo một controller tên DemoController
Chuột phải src -> chọn New -> chọn Class


Hướng dẫn tạo Spring MVC Project với eclipse – Tạo View
1/ Tạo file welcome.jsp tại /WebContent/WEB-INF/jsp/
1.1 Tạo thư mục jsp
- Chuột phải WEB-INF -> chọn New -> chọn Folder
- Nhập jsp tại Folder name -> chọn Finish
1.2 Tạo file welcome.jsp
- Chuột phải jsp -> chọn New -> chọn JSP File
Mở file welcome.jsp và bổ sung code
2. Tạo file index.jsp tại /WebContent/
2.1 Chuột phải WebContent -> chọn New -> chọn JSP File
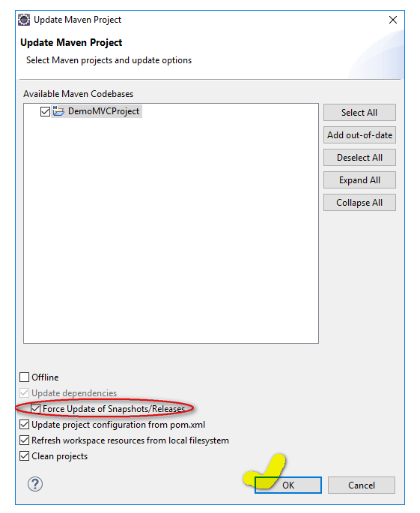
Hướng dẫn tạo Spring MVC Project với eclipse – Maven build
Chuột phải Project -> chọn Run As -> chọn Maven build…


Hướng dẫn tạo Spring MVC Project với eclipse – Sửa lỗi file pom.xml

Hướng dẫn tạo Spring MVC Project với eclipse – Chạy project
Chuột phải Project -> chọn Run As -> chọn Run on Server


0 Response to "Hướng dẫn tạo Spring MVC Project với eclipse"
Post a Comment